Academic Website Template
docs
- What is this?
- How do I download this?
- How do I modify this?
- How do I upload (publish) this?
- How do I credit the author?
What is this?
This free website template is designed specifically for academics—everyone from graduate students entering the job market to established faculty. With some modification, it could easily serve professionals in many areas. The site is structured around four primary pages:
- About me — Lorem, ipsum dolor sit amet consectetur adipisicing elit. Porro, ut!
- Vitae — Lorem, ipsum dolor sit amet consectetur adipisicing elit. Porro, ut!
- Teaching — Lorem, ipsum dolor sit amet consectetur adipisicing elit. Porro, ut!
- Research — Lorem, ipsum dolor sit amet consectetur adipisicing elit. Porro, ut!
Because the site is built with Bootstrap v5.3, a ubiquitous and user-friendly front-end, the template can be extended to include any of the major web components on offer in Bootstrap, including Accordions, Modals, Carousels, Navbars, Popovers, Cards, and Offcanvas, to name only a few.
And with my free Bootstrapr.io app, you can create these components and pages in minutes to extend this template to meet your specific needs.
How do I download this?
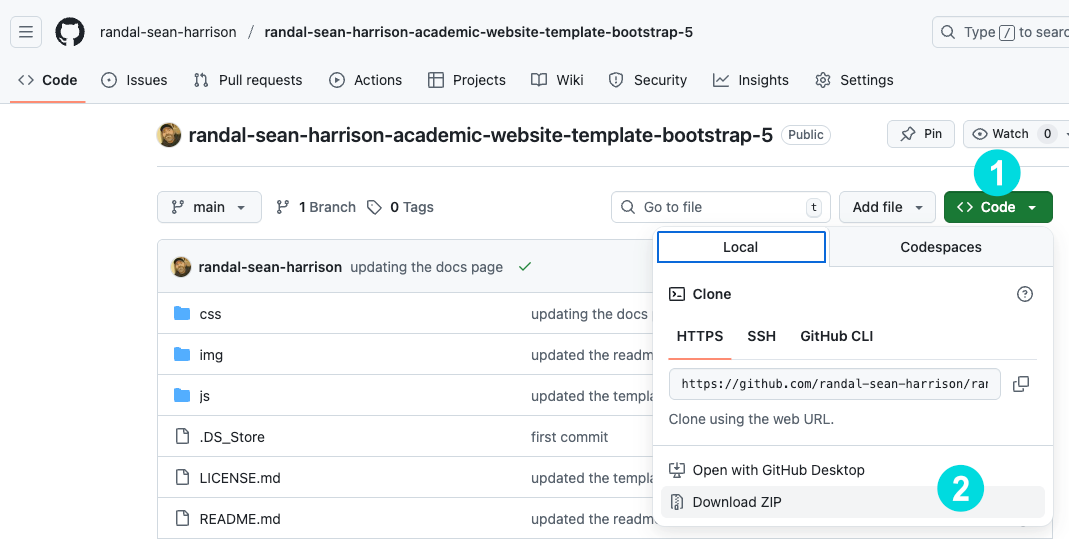
You can download the website template in several ways. First, visit the GitHub Repo(sitory) for the template.
Steps
- Click on the 'Code' button
- Click 'Download ZIP'
- Save the ZIP file to your desired location (Desktop?)
- Unzip the file by double-clicking it
- Delete the ZIP file
- Rename the extracted folder to your liking
Alternatively...
If you're familiar with Git/GitHub you can clone the repo directly. Open your terminal application and change directory to your desired location. Then, simply copy this line and paste it into your terminal/command line interface (CLI):
git clone https://github.com/randal-sean-harrison/randal-sean-harrison-academic-website-template-bootstrap-5.git
How do I modify this?
Modifying the website is easy. Once you've downloaded the folder containing the website, open that folder in any code editor and make changes to individual files. Use my Bootstrapr.io tool to create any custom elements you require that are not present in the original template. I demonstrate this process in this video:
Modifying the Academic Template
TUTORIAL (28 min)
In this video tutorial, I cover editing the noteworthy features outlined below.
Noteworthy Features
-
docs.html, README.md, LICENSE.mdThese files are used my documentation purposes only. You can safely delete them.
-
navbar.htmlThis file holds the navigation for the website. It's loaded dynamically, so if you are add another page, make sure to match the ID (
id="") of the page on the list element (figure 1) in the nav to thedata-current-pageattribute on the<body>element of the new page (figure 2). Don't forget to add the new page link to thefooter.htmlpage.For a demo on how to add a new page, see the video below.

Figure 1: navbar.html page 
Figure 2: the newly created page -
footer.htmlThis file holds the footer for each page. The footer has a set of navigation links, as well. Adding links to the navigation in the footer is much less complicated than adding new links to the
navbar.htmlfile. Simply add the link to the footer navigation and point it to the correct new file. -
acknowledge.htmlThe
acknowledge.htmlfile is inserted above the footer on each page. If you wish, you may remove it entirely, or simply hide it. To hide it, open thecss/main.cssfile, comment out/* display: block; */, and uncomment/restoredisplay: none;.
Figure 3: Hiding the Acknowledge banner -
vitae.htmlIn this template, I insert a Google Doc into the
vitae.htmlpage. The clear benefit is that you only ever have to edit your vitae in a single place. To replace my sample vitae (Google Doc) with your own, simply replace the Google Document ID (see figure 4, below). Make sure to do it in both places: 1) The link to Google Docs, 2) the embed of the Google Doc.IMPORTANT: Don't forget to share your Google Doc publicly to make your vitae readable to the public.
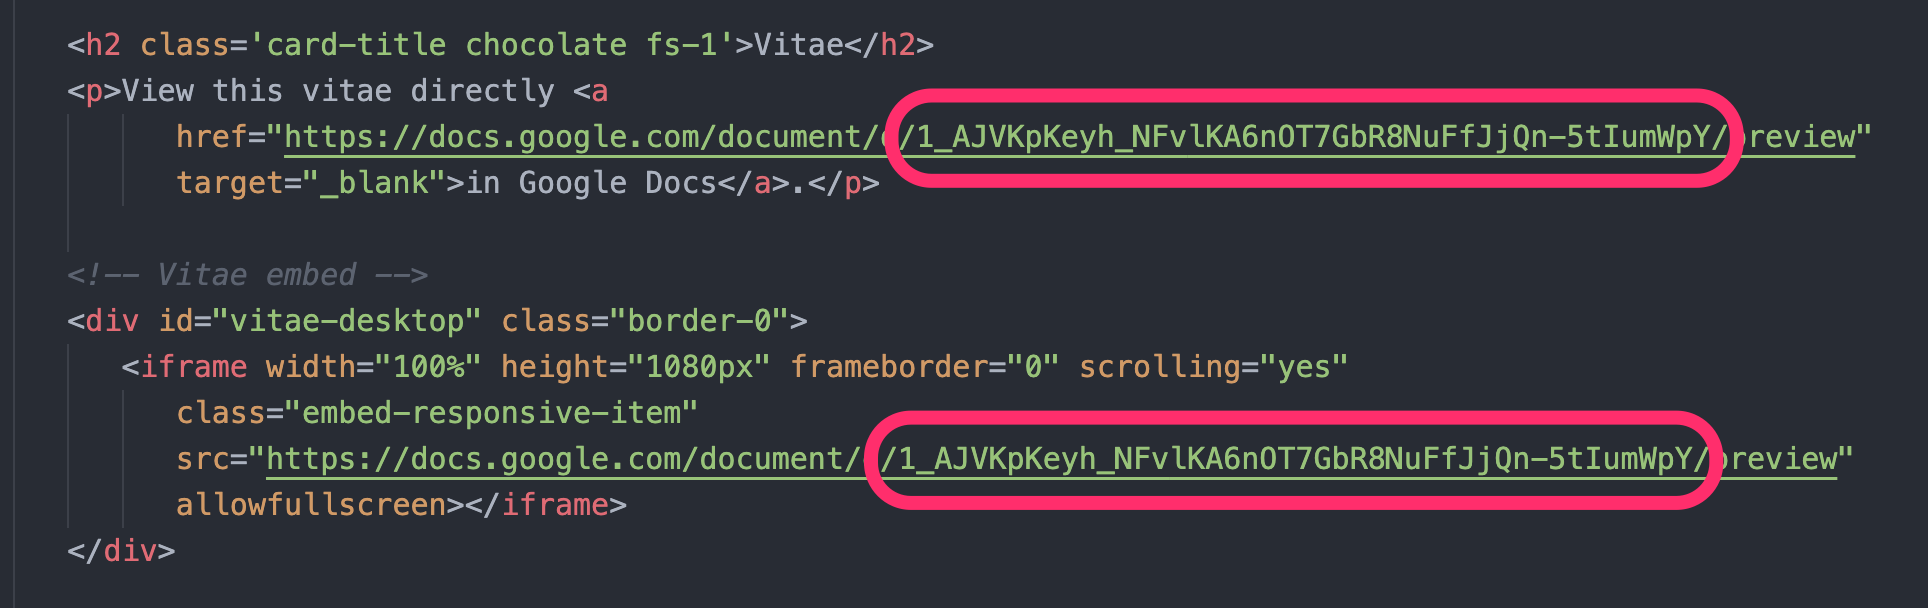
Figure 4: Replacing the Google doc ID -
index.htmlBanner
The blue banner atop the homepage points to how to download the template and links to the documentation page. For your purposes, it's not necessary to keep it. You can remove it entirely, or hide it (in case you'll need a banner in that location in future). To hide it, open the
css/main.cssfile, comment out/* display: block; */, and uncomment/restoredisplay: none;.
Figure 5: Hiding the homepage alert Photo (Head Shot)
The photo (head shot) is made round by adding the
.rounded-circleclass. Omit it to remove all roundness. And here are all the Boostrap v5.x options for the roundness of the photo:rounded-{top|bottom|start|end}-{circle|pill|0...5}
Map
In the left column, there is a link to JPEG for a map to my office:
.map-to-my-office.jpg. The link opens in a modal. The image is located in theimg/directory. Replace this with your own image, aiming for a minimum width of at least 300-400px and ideally a maximum width 600px. -
humans.txtPlease leave this in place, as it attributes original creation of this template to me. For more, see How do I Credit the Author, below.
How do I upload (publish) this?
There are many platforms for publishing simple static HTML webpages online. Happily, many are free. In the videos below, I will demonstrate two options for uploading your static site. I will demonstrate uploading to GitHub and Netlify, two of the most ubiquitous platforms.
- Drag and Drop — For those new to the command-line, it may be easier to drag and drop your entire website folder to upload it. We'll use Netlify, since it keeps your folders more easily synced when dragging and dropping.
- CLI — I find using CLI (Command Line Interface), aka 'Terminal' to be the fastest way to deploy changes you've made to a local website to the cloud. We'll use GitHub, since it provides a robust interface, and it takes just a few commands, which will become rote in no time.
Note also that these videos below illustrate only two of many possible ways to upload your static site. For example, you might commit and push your changes to the cloud from within a coding app such as VS Code. You might use a visual app, such as GitKraken. You'll want to experiment to find the workflow that suits your needs and skills.
Uploading with Drag-and-drop (Netlify)
TUTORIAL (10 min)
In this video tutorial, I explain how to upload your website to Netflify pages through their drag-and-drop interface.
Uploading with CLI (Github)
TUTORIAL (23 min)
In this video tutorial, I cover uploading your website to Github through the CLI.
Useful commands at a glanceGit status
>git add . >
git commit -m "message" >
git push
How do I credit the author?
Thank you for choosing this free web template! You are welcome to use and modify this template according to the terms of the MIT License, which is included with this project.
Crediting the author (me) is not required on any audience-facing pages of this website once you've
modified it.
However, I kindly
ask that you retain the included humans.txt
file,
unmodified. This file
contains
important,
non-visible metadata about the original creator and the template's initial structure, which helps to
maintain a record of its development.